*EDIT* These plates are NOW AVAILABLE FOR SALE - please see the thread below for details!!!
http://sn95forums.com/showthread.ph...d-details-inside&highlight=billet+gauge+plate
_______________________________________________________________________________________________________________
Sometimes I get envious of how pretty some of the cars are on this board. There are really some well-done cars with great all-around packages, inside and out.
With that in mind, I thought maybe my poor daily driver was being a bit neglected. It's a good soldier. Always runs. No real problems. 135,000 miles and gets abused mercilessly at the track for no reason and never quits. Runs 13s too! I love my daily driver.
Anyway, I decided some interior upgrades were in order.
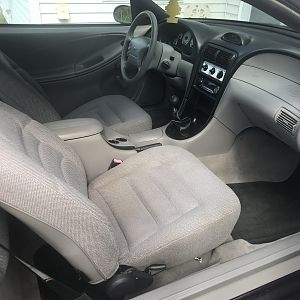
First things first, I took the car to the car wash. They did a good job washing it and vacuuming out the interior while I people watched and drank my big ol' soda.
Then I remembered I had some gauges in my closet that have been sitting for a while. I'm quite certain they were for some project long since abandoned. Who knows?
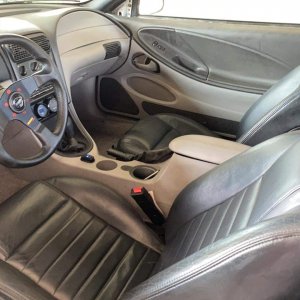
I had mechanical oil pressure, mechanical water temperature, and vacuum gauges. All 2 1/16" Autometer Pro-Comp Ultra-Lite full sweep. I had asked my friend to make a gauge plate for me some time back for my other SN95. It fits in the dash beneath the CD player. He's got a couple CNC machines in his garage so he makes me fun stuff.
As always, the gauge plate is
perfect, and he even used a tiny end mill to cut it so it would leave all these wonderful tool marks in it. I love tool marks. They even show after the plate was black hard-anodized.

Here's what the dash looked like when me and my friend started. I had my OEM CD player filling the slot even though I got a new radio some time back.

Then I used those Ford radio removal tool thingies to pull it out.

So I stuck all three gauges in the plate, screwed down the retainer thingies, and my friend and I started running sending units. I made a little wiring harness for the bulbs, which got tied into the factory dash illumination ciruit so my gauges are adjusted by the factory dimmer switch.
")

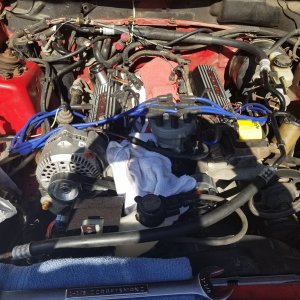
First was the oil pressure tube. This wasn't much fun. I had already installed a brass tube and tee sometime back while I was replacing my OEM oil pressure switch. It still sucked. This screws into the side of the block near the oil filter, and there's not much room to work. Further, the tee was to "wide" (or tall?) and kept hitting the block when I was screwing it into place. Thankfully as I mentioned before, my friend has a couple handy-dandy CNC mills in the garage.

So into the mill went the brass fitting.

He typed in a quick program (from memory) to cut a circle, and to step down .020" each time he re-ran the program. The fitting was milled down in no time flat.
After some quick de-burring, we were back in action.

Success!!! The copper tube goes to my gauge, and the OEM oil pressure switch is still attached at the end.

We had to give up for the evening because I failed to buy the special gauge sending unit fitting needed to install a mechanical sender in a Ford. The ones that comes with it is 1/2" NPT, and our Fords use 3/8" NPT. So, if you want to do this - DON'T FORGET THIS FITTING!
The part number is in the picture.

So today I decided to finish up. First, locate the stock temperature sending unit. It's in the front of the manifold on the driver side.

Unscrew the stock unit, and install the autometer fitting. Don't forget the teflon paste.

Then install the autometer sending unit and tighten down. Again, don't forget the teflon paste.

That's it. Water temp is done. Onto the vacuum gauge. I ran to Checker and bought a couple rubber vacuum thingies, and I had a plastic tee in the garage already.

I tied it into the small vacuum line that actuates the HVAC mixture door. It goes through the firewall into the A/C box. Be careful here with these old brittle lines, or you'll end up breaking it like I did - then having to dig around boxes in your garage to find some replacement tubing.

So that's it. Three gauges.
Here's the finished product. I'm very happy with it; it's a very clean install and doesn't look ricer or out of place.

The interior is looking a little better.

That's all for now!
Paul.
![20230404_090128[1].jpg](https://www.sn95forums.com/data/attachments/24/24906-dc88d602d50aea80c66f7e8b78f7e7fb.jpg "20230404_090128[1].jpg")