FuseBox Distribution plate

brians98

New Member
Joined
Jul 19, 2024
Messages
4
Reaction score
4
Hey Y'all I am new here. But, grateful to have at my disposal.
Hoping that somebody might have some insight. I did a Pi swap into my 1998 Mustang gt, the engine is a 2003 but I am still using the npi cover and coil pack setup to avoid completely redoing the electrical setup. Ironically I am still dealing with an electrical gremlin. The fusebox metal under piece (I guess it's called the distribution plate).The one that connects to the power supply stud is just mangled and parts of the plate have unfortunately broken off. Thus, my car only clicks when turning the key. Does anyone know if I'm f*cked or can I replace that piece from a salvaged unit on another car. Is this something I should just pay to have done too?
 

ttocs

Post Whore
Joined
Oct 9, 2009
Messages
33,600
Reaction score
6,036
Location
Evansville Indiana
I am only familiar with the set up on my 94 but on it I know replacing the fuse box would not be a simple plug n play 10 min job by any means. The fusebox is part of the engine compartment power harness and you could probably pull the connectors out of the old broken box and then put them into a new box(if you can find one, it is not a part at the dealer) but it would be a fairly tedius task to ensure that they are all put in the correct part. Replacing the entire fuse box without doing this would mean replacing a good portion of the engine bay harness which will not be cheap, nor easy to find again.

Now we can't answer if this is something you can do yourself as we do not know your experience.
 

lwarrior1016

Mr. Secondary Timing Chain
Staff
Joined
Sep 22, 2014
Messages
8,860
Reaction score
4,925
Location
South Mississippi
Oh man, breaking that has been one of my biggest fears when working on my car. I don’t have a direct answer to the question, but I’d suggest getting a fuse box from the junk yard and just taking it apart to see if yours can be fixed. I’d imagine that strip can be replaced somehow, but don’t know if it’s molded to the inside of the box or what.

Changing the fuse box is a royal pain because there is no plug on the bottom, just a bunch of individual wires stuck in the box.
 
OP
OP
B

brians98

New Member
Joined
Jul 19, 2024
Messages
4
Reaction score
4
Thank you so much guys, You are right I forgot to include I frequently will work on my cars, but this might be a little bit more than I can take on! Yes I am so annoyed this piece got broken it happened when I removed the nut from the fusebox connecting the two power lines for the two different harnesses to 12 volt. I appreciate your time guys.
 

PNW Mike

New Member
Joined
Jul 26, 2023
Messages
26
Reaction score
12
You should be able to swap out that piece of the fusebox for a junkyard one or swap part of a junkyard fuseblock into your car. You will need to depin the various terminals in your current fusebox and stick them back in place later, but that's pretty doable with some time and care. This falls into the "tedious, but not hard" category once you know how to do it.

If you want to try this, you need to grab an 
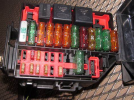
identical fusebox or two from a junkyard and experiment on them first to see how things come apart and go back together. I did that for my '06 Ranger to figure out how to add a few circuits to empty fusebox slots for extra lights and such, and it came out looking like it came from the factory - you couldn't tell what I'd done unless you looked really closely at it or you knew a stock fusebox by heart. It took a few tries and experiments, but it only cost me about $70 for four junkyard fuseblocks (I got two wrong ones by mistake the first time - similar is not the same as identical, oops) and I got a bunch of spare fuses/relays to experiment with and keep around as spares. I now know a lot more than I ever thought I would about Ford fuse blocks of that era, especially Ranger and Explorer ones. :)

If you have never depinned connectors before, there are a videos about it to show the process. A good assorted set of depinning tools is pretty cheap on Amazon or similar, and well worth it if you do this even one time, please ask if you want example links. It takes some patience to get the hang of it, but once you do, it's pretty easy. In most cases a human assembled these things, and they are normally field serviceable with the right tools, parts, and knowledge.

In any connector or fuseblock, every terminal has a small tab or tang that retains it. To remove it, find that tab/tang either on the terminal (push towards the middle of the terminal to release) or on the connector body (push away from the terminal to release). The trick is finding where that tab/tang is and figuring out how to get it moved out of the way without breaking stuff. If you do it right, the terminals can be easily removed and re-inserted multiple times without any issues. On the Ranger, the terminals were larger and very easy to remove once I figured it out. Smaller terminals are harder to depin as everything is smaller and harder to see/work with, but not impossible, just a bit more fiddly/fussy.


With this type of process, I was able to add four relays into my Ranger's fuse block and about 8 circuits, but it was a way bigger fuse block than the Mustang one and very under utilized in the Ranger. The Explorer used the exact same fuse block for a few years and had a bunch of extra circuits for power seats and the like that the Ranger never had. I figured since I was in there, I'd fill out a bunch of the extra fuse slots and leave capped off wires in a more easily accessible location for later use, just in case, because if you don't, odds are you'll want to use one a few days after reassembling the fuse block without them. :)


Happy to answer any questions folks might have.
 

Attachments

  • 1724220280947.png
    1724220280947.png
    437.4 KB · Views: 1

PNW Mike

New Member
Joined
Jul 26, 2023
Messages
26
Reaction score
12
If you want to give this a try, disconnect the battery first! Grounding out the main battery cable to the fuse box to the fender or similar will give you a major pucker moment and an ugly arc mark on things, or worse, damaged or melted wires. Also, take pictures at each step of the process from multiple angles as needed so you can figure out how it all goes back together again - bits are pretty close to free and almost everyone has a good quality camera in their phone these days. Also, label or tag every single wire for it's correct location in the fuse block before removing them so you know where they all go back into later - sometimes the same wire color gets used for more than one thing. Fortunately everything in the fuse block is numbered, and on relays the individual terminals (usually 4, sometimes 5) have well known standardized numbers you can refer to. Also, old plastic gets super brittle - be gentle and take your time. Once you understand how stuff comes apart, you can usually get it apart without forcing it and without breaking anything.

1) Remove all of the fuses, circuit breakers, relays and such, taking note of where they were. On some fuse blocks there are diodes that look like fuses - take note of which way they go if you have any.

2) Unclip or unbolt the entire fuse block from whatever it's mounted to. if the main harness has no slack in it, pop out a few clips that hold the main wiring harness in place - you want to have room and slack in the wiring harness to move the fuse box around and to turn it upside down to work on it, or at minimum to turn it at least half way around (on it's side) so you can access the bottom easily without strain on the individual terminals. A good interior trim tool set can help with undoing the little clips typically used to hold harnesses in place.

3) The fuse box should have a front and a back half that need to come apart. The fuses and terminals are clipped into the front/top half - the back/bottom is normally just a protective cover. If there is any electrical tape holding the fuse box to the main harness, undo the tape. Remove the back half of the fuse block by undoing the tabs on the outside edges near the tabs that hold the top protective cover on. This allows you to gain access to the terminals to remove them - in most cases terminals remove from the back of the connector, and in this case is the top part of the fuse box is just a big funny looking connector with lots of wires in it.

4) The red pieces (or whatever colors yours are, the Ranger had yellow ones) can come out from the top after you gently move and unclip the small plastic clips that hold them in, again taking note of where they are positioned. A set of small picks or similar tool is good for this, you may need to hold one or two clips "open" to get the red pieces to release. Sometimes the clips need to be moved in unintuitive ways - look at the underside of the fuse block to see if there are any small spots that need to be unclipped. I broke a couple of clips on the junkyard fuse boxes I picked up before I figured out that they had a small clip in the middle that had to be released form the back. These pieces are the TPA (Terminal Position Assurance) that lock in the individual terminals and prevent them from accidentally popping out of place once everything is assembled. Other connectors have these as well, just not as big. Save them for reinstall later.

5) All of the individual wires behind the fuses (and possibly relays, if needed for access) can be removed so you can see what you're doing - they each likely have a small tab on the terminal or plastic clip on the fuse block that hold them in. Use an appropriate depinning tool to press those tabs out of the way and the terminals pull out of the back of the fuseblock, one at a time, taking note of how the terminal fits into the fuse block - they have to be oriented correctly to work and hold in place. On the Ranger fuse block it was a small plastic tab on the fuse block that could be pushed out of the way and then the terminal removed. Looking through the fuse block with a light behind it and wiggling the wires was very instructive for figuring this out, as was looking in empty slots with the light behind it. This trick can also work on other connectors you want/need to depin.

6) Now all of the "terminals" that make up the main power distribution plate that can be unclipped and removed. If it's like the Ranger fuse box, the distribution plate will look sorta like a bunch of individual wire terminals stamped and molded and bent and folded into a single large piece that provides power to one side of all of the fuses - it's basicially a funny looking bus bar that is always "hot" with battery voltage. This is where you really need to take your time to avoid breaking or bending the plate you want to liberate from a junkyard fuse block so you can replace your damaged one. Take careful note of how the plate is positioned and how it came out so you can install it in your fuse block.

7) Install the replacement distribution plate, getting every part of it clipped in correctly without bending or breaking it. Work slowly and carefully.

6 and 7 alternate) If the junkyard fuse block is in better shape that yours or you think the distrubution plate will be too hard to remove and replace, just use the junkyard fuse block top piece with the distribution plate in it and install all of your wires into it with the steps below. This assumes you found a 100% identical one, though.

8) "Assembly is the reverse of disassembly". Refer to those pictures you took earlier and double check everything, then double check it again. Make sure you intert the terminals in the correct orientation - they should just push in from the back and you'll often hear and feel a little click when they seat correctly.

9) Replace any tape you removed from the main harness with good quality fabric harness tape that will stay there forever, not normal/typical vinyl electrical tape that will get gooey and fall off in a few months. Amazon or similar carries the right tape; I can provide some examples of what I've used if you'd like. If used from the factory, this tape provides important strain relief and support for the harness, and the tape needs to stay there for the life of the vehicle. Harnesses that flex and move over time will tend to slowly break wires from the repeated movements and/or have strange problems that are a pain to sort out. If there was no tape on yours form the factory, skip this.

10) Optional: You should have some leftover terminals with wire stubs attached from the junkyard fuseblock(s) you got. If you have any empty slots in your fuse block, you can use those terminals and wire stubs to add in new circuits to any blank spots in the fuse block, and then slice onto those wires to run any new circuits you might need. Same with relays if you need to trigger a high current device. If you don't need the extra circuits right now, cap them off with some heatshrink and tie them off near the fuseblock, and make a note of which wire goes to which fuse/relay for "future you" to refer to.
 

RAU03MACH

Legend
Joined
Apr 23, 2019
Messages
7,367
Reaction score
7,411
Location
NEW MEXICO
the nut and stud that run through that plate are a pia when removing
next time you remove one take a pair of vise grips on the very tip of the stud clamp it tight
then hang on to it wrench the nut off
i know many people that have made that mistake just trying to bust that nut and break stuff
 
OP
OP
B

brians98

New Member
Joined
Jul 19, 2024
Messages
4
Reaction score
4
Wow, I am blown away by all of your experience and detailed instructions. Thank you so very much! I am now confident to take this one on, I have a good condition same part numbered fusebox on the way in the mail that I am going to either swap in completely or at least swap the distribution plate to.
Also, yes I feel like a nincompoop for cranking on the stud without any clamping, once I'd figured that one out the deed was done and I had a mangled distribution plate, very frustrating as I haven't been able to enjoy the pi swap my dad and I put in earlier this year. But, I love these sn95's!
Thank you again everyone!
 

RAU03MACH

Legend
Joined
Apr 23, 2019
Messages
7,367
Reaction score
7,411
Location
NEW MEXICO
good to hear it is by far the best body
there are not many new ones i like
the classics bosses mach 1 fast backs are right where the sn95 to 2004 are
 

PNW Mike

New Member
Joined
Jul 26, 2023
Messages
26
Reaction score
12
Here are the links to the items I mentioned before; I realized it would be goodness to include them for the benifit anyone looking at this thread in the future. I'm only giving examples of what I used to get folks pointed in the right direction. I get nothing if anyone buys these products other than the satisfaction of (hopefully!) helping someone else with their project.


Terminal depinning/removal tool set - lots of places sell this exact same set, and there are other similar sets, this is just the one I bought a few years ago: https://www.amazon.com/gp/product/B08LQG4YHN

Cloth Harness Tape - lots of similar brands and sizes are available: https://www.amazon.com/gp/product/B0895FZVZ2
 

cobrajeff96

Well-Known Member
Joined
Feb 1, 2022
Messages
1,923
Reaction score
1,920
Location
Germany
I'd recommend going with PET tape instead of fleece tape for anything outside the cabin space. The fleece tape is wonderful stuff I'll say but I only use it inside the car, and I use PET tape everywhere else. If any tape is to be used in engine compartment space, it should be PET and certainly not fleece.
 

PNW Mike

New Member
Joined
Jul 26, 2023
Messages
26
Reaction score
12
Absolutely. High heat with oil and other such fun, like for wiring on the motor, calls for more care and attention to what you chose. I usually keep a few roles of fleece tape on hand for random projects under the dash and inside the car (stereo work, etc.) and have had good luck with it anywhere not right on or immediately next to the motor. That said, more heat protection for the wiring in the engine compartment is never a bad idea. Of course then you want to make sure you are using wire with the right type of insulation as well... :)

There are a million different options for properly securing and protecting a wiring harness for different situations, and cheap parts store wire insulation won't hold up to high heat and engine comparment oil and other nastyniess like higher quality stuff will. Like any other type of specialized work, the deeper you go, the more variables and choices there are to consider. It's not unlike selecting a cam for the first time...
 
OP
OP
B

brians98

New Member
Joined
Jul 19, 2024
Messages
4
Reaction score
4
Man this forum is by far the best! Got a great community of cool people who like to help! Thanks again I added those links to my list on amazon Mike!
Hope you guys have a blessed day!
 

96blak54

Moderator
Staff
Joined
Feb 21, 2011
Messages
10,544
Reaction score
3,799
Location
Lawrenceburg Kentucky
Im glad you like the forum, but now you have been recruited! All you need to do is report here everyday. Read the threads, make new threads, reply comments, and create a build thread. We all in learning mode and can learn alot from each other. Im glad you are here!
 

lwarrior1016

Mr. Secondary Timing Chain
Staff
Joined
Sep 22, 2014
Messages
8,860
Reaction score
4,925
Location
South Mississippi
One thing to note about that Tesa tape though, it will leave the wires super sticky and covered in glue residue after it’s been heat cycled. If you ever have to remove the tape, you will hate life. It attracts dirt pretty bad too.

After wiring my car 4 or 5 times and the various other cars I’ve built, I much rather some good electrical tape just making rings around the wire bundle every 8 inches or so, then covering with tech flex loom.
 

ttocs

Post Whore
Joined
Oct 9, 2009
Messages
33,600
Reaction score
6,036
Location
Evansville Indiana
tesa is nice on the ends here/there but I have to agree that I just put a wrap of electrical tape every foot or so is what I do.
 

cobrajeff96

Well-Known Member
Joined
Feb 1, 2022
Messages
1,923
Reaction score
1,920
Location
Germany
Interesting. I've found the exact opposite, where standard vinyl electrical tape leaves the nasty sticky residue and Tesa cloth tape doesn't. Moreover, cloth tape doesn't require stretching like vinyl does and it withstands heat and chafing so much better. To each their own, though.

You have to be careful about Techflex (expandable sleeving or split sleeving) as well. There are many different kinds intended for different applications. Most standard techflex will stand up to about 250*F temperature, which is fine for an engine bay in general. My entire coyote swap harness is covered in the stuff, but make no mistake if it's near anything truly hot there needs to be specialized looming such as Insultherm or the higher heat rated Techflex products whatever they may be. Any heatshrink used in that sort of situation will have to have different ratings as well. Certain looming and heatshrink will have better resistance to oil/gas as well. It's all in the fine print, as they say.
 

Attachments

  • 20210404_130111.jpg
    20210404_130111.jpg
    163.3 KB · Views: 6
  • 20221015_151758.jpg
    20221015_151758.jpg
    276.1 KB · Views: 6
  • 20210413_122030.jpg
    20210413_122030.jpg
    149.5 KB · Views: 6

ttocs

Post Whore
Joined
Oct 9, 2009
Messages
33,600
Reaction score
6,036
Location
Evansville Indiana
now it does depend on what kind of electrical tape you use. The cheap shit is cheeeeeeeeeeeeeeeeep shit! I have always used 3m super 33 as all the shops I worked at learned their lesson on it. I was at one shop where the installer got super pissed when the owner came back with cheap/no name tape I thought the dude was gonna quit honestly....
 

PNW Mike

New Member
Joined
Jul 26, 2023
Messages
26
Reaction score
12
Cheap electrical tape is best suited for the trash bin. Once you've used quality tape on a project or two, it's obvious why the cheap stuff is cheap, and why folks who know better refuse to use it.

Years ago, I bought a bunch of rolls of 3M electrical tape, one each in pretty much every color they sell and it's come in super handy for marking things over the years, such as taping up a neutral in an electrical panel in white, or knowing for sure I was the last person to touch something. Learned that last bit from my dad - he always used some unusual color electrical tape (a specific shade of purple, IIRC) and it was really obvious if someone else had messed with something he'd worked on. After all these years, a few of the rolls are almost gone. Lots of pink is left for some unknown reason, though... :)

Being aware of how hot your wiring will get matters. Using the wrong wire/tape/harness protection will work for a while, but eventually, it will fail, and usually at the most inopurtune time - Murphy's law and I are well acquanted, unfortunately. Even on an engine (vs just in the engine compartment), there are going to be vastly different temp levels depending on where your wiring goes. That last 18" of wiring out to the O2 sensors is going to get a lot hotter than the wire loom to the injectors, or the wire that goes out to the mass air flow sensor or other near-the-engine-but-not-directly-on-it types of connections.
 

Latest posts

Forum statistics

Threads
77,824
Messages
1,511,309
Members
15,242
Latest member
Whiplash-Smile

Members online

Top