What Did You Do To Your Car Today?

duh09

Legend
Joined
Apr 23, 2008
Messages
9,618
Reaction score
724
Location
Memphis-ish
New valve cover gasket and power steering pump in the XJ, got the bracket welded up for the WJ. Productive day for once… now if I could just get my mower fixed.
 

Adam.z.g

New Member
Joined
Nov 22, 2022
Messages
21
Reaction score
94
Installed maximum motorsports extreme duty rear control arms and new stock uppers. Had some cheap aftermarket upper and lower arms already. Finishing the coilover install in the next few days. This winter I’ll crack into the Panhard bar and tourqe arm boxes IMG_7296.jpegIMG_7297.jpegIMG_7298.jpeg
 

Daryl

Well-Known Member
SN95 Supporter
Joined
Apr 5, 2020
Messages
3,278
Reaction score
1,654
Location
SoCal
Cursed at it… Repeatedly! Having no fun installing the water temp gauge. Crappy installation instructions don’t help someone like me with little to NO electrical knowledge. Errrrrgh!
 

Musturd

Post Whore
Joined
Feb 12, 2011
Messages
10,698
Reaction score
2,600
Cursed at it… Repeatedly! Having no fun installing the water temp gauge. Crappy installation instructions don’t help someone like me with little to NO electrical knowledge. Errrrrgh!
It’s really easy . Check YouTube for some how to’s
 

Daryl

Well-Known Member
SN95 Supporter
Joined
Apr 5, 2020
Messages
3,278
Reaction score
1,654
Location
SoCal
It’s really easy . Check YouTube for some how to’s
Here’s why:
1. My lack of electrical knowledge: there’s a huge and a black wire on the back of the gauge. Which is power? Which is ground? And where do I attach them to?
2. Where is safe to drill a 7/8” hole? Or, if I don’t drill, where’s the main bunch of wires that ttocs mentioned there’s enough room to fit the gauges cable could fit through?

The YouTube videos I found didn’t answer these questions
 
Last edited:

joemomma

Well-Known Member
Joined
Dec 9, 2020
Messages
1,340
Reaction score
838
Not familiar with the gauge install, but what in the world in it needs a nearly 1" hole?
 

Daryl

Well-Known Member
SN95 Supporter
Joined
Apr 5, 2020
Messages
3,278
Reaction score
1,654
Location
SoCal
Not familiar with the gauge install, but what in the world in it needs a nearly 1" hole?
The grommet that goes in the firewall. If Opal95 and ttocs idea work, I wouldn’t need to drill a hole
 

joemomma

Well-Known Member
Joined
Dec 9, 2020
Messages
1,340
Reaction score
838
The grommet that goes in the firewall. If Opal95 and ttocs idea work, I wouldn’t need to drill a hole
Right on. Were it me, I'd just go slightly larger than the cable needs and find a suitable size grommet if you can't find the spot they mentioned.
 

Daryl

Well-Known Member
SN95 Supporter
Joined
Apr 5, 2020
Messages
3,278
Reaction score
1,654
Location
SoCal
Right on. Were it me, I'd just go slightly larger than the cable needs and find a suitable size grommet if you can't find the spot they mentioned.
A viable option but unfortunately there’s the coupler for the probe already on the cable, so the hole has to be big enough for it to pass through
 

joemomma

Well-Known Member
Joined
Dec 9, 2020
Messages
1,340
Reaction score
838
A viable option but unfortunately there’s the coupler for the probe already on the cable, so the hole has to be big enough for it to pass through
Ahh, I see said the blind man! Makes sense now.
 

cobrajeff96

Well-Known Member
Joined
Feb 1, 2022
Messages
1,934
Reaction score
1,937
Location
Germany
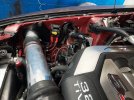
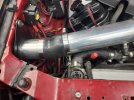
Did a thing (or two) today...

Terminated some 4awg leads from the lithium starting battery and the lead main battery to the battery combiner (voltage sensing relay / automatic charging relay) so that the lithium will charge only when necessary and then promptly disconnect itself thereafter. Prevents either battery from draining the other as well as prevents splitting the amperage between the two for too long.

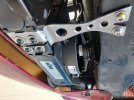
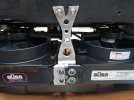
Also fashioned some steel bracketry for a stabilization mount, bracing the engine oil cooler and the power steering cooler to the lower radiator core support. Can't see it but I got some thick rubber pads that go under and over the side attaching to the cooler frames. Even managed to counter sink the holes drilled in the bracket that lighten up the weight. Don't look too shabby now. Off to the powder coater we go!
 

Attachments

  • 20240802_174708.jpg
    20240802_174708.jpg
    226.8 KB · Views: 8
  • 20240802_174717.jpg
    20240802_174717.jpg
    202.7 KB · Views: 9
  • 20240802_174738.jpg
    20240802_174738.jpg
    203.7 KB · Views: 8
  • 20240802_125653.jpg
    20240802_125653.jpg
    148 KB · Views: 8
  • 20240802_125701.jpg
    20240802_125701.jpg
    148.2 KB · Views: 8

Forum statistics

Threads
77,825
Messages
1,511,374
Members
15,245
Latest member
Rascal28950
Top